Photo Shop
this is on photoshop and it helps you bend words around shapes and bending lines and when you put the font and colour together it bring the words to life and makes this effective
warping text this helps use to see that the text is bending and wavy this also helps to change the way the text looks because there are loads of different ways to warp the text. use the words that you want and drag and drop text layer to the paper icon next to the bin to duplicate, change font, colour and size
filters these filters helps adjust the way the image looks therefore it changes a normal image into a image that you can make blurry or glow. There are loads of different ways to change the way the image looks .
this is my name looking like its on fire i did this using lots of different layers and then i rasterized the text then this allowed me to go into liquify and stretch the letters to make it look like its on fire, the i went into filters and made the letters blurry with the gaussian blur and this made the words look like they where on fire
Faces from large brushes
first you get any image then insert a layer at the top of the image and turn it white then open the brushes panel chose an interesting brush and make it really big. remain on the top white layer and select the rubber, set the opacity to 35 and start removing the top white layer to reveal the face. use the compass to change the angle of the rubber, click several times to remove more white layer
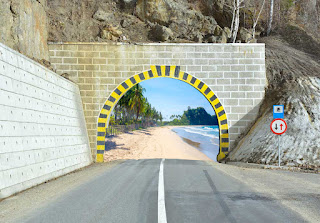
this is a tunnel and i have copied an image of a festival and a beach then i got the magnetic lasso tool and went round the entrance of the tunnel then i went to paste special then clicked on paste into and it allowed the festival and beach image to go in where the magnetic lasso selected
this is medusa and i have used photoshop to replace and make the face of medusa into Dwayne Johnson and i used the lasso tool to highlight the face of medusa then i used special paste into to put Dwayne Johnsons face into medusa then i used the feather tool so that the edges of the face wouldn't be sharp and now it looks more real because the two faces blend into each other rather then looking like two other faces.
this is my name in ice and i created this by doing almost the same stuff on how I made it to look like fire i used the same tools such as the liquidify and this let me to make the letters in my name to look like it is melting and i used three different colours to create the ice look then i merged the layers together and then liquidified them to finally create this effect of ice


the assigning to a line works - your task ewas to apply it to an image - if not in class then on your won time
ReplyDelete